

BEFORE ATTEMPTING TO START THE ENGINE
Lower the motor into the water.
Make sure the fuel hose is securely connected to the fuel tank and the motor.

- Direct the pilot water hole to the position you intend.

- Make sure the motor is in “NEUTRAL”.


- Make sure the lock plate is in place and the emergency stop switch cord is fastened securely to your wrist or appropriate clothing area such as your belt.
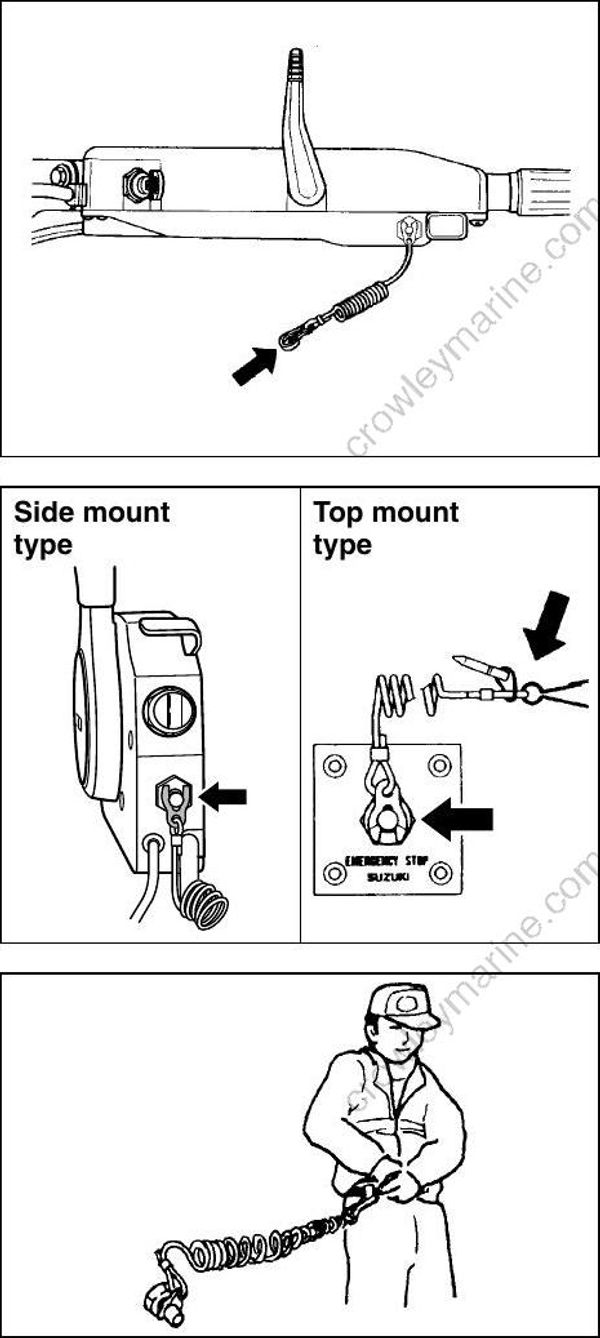
• The emergency stop switch cord should be fastened securely to the operator’s wrist or to an appropriate clothing area (belt etc.). In this way, in an emergency, or if the operator is thrown overboard, the detached cord will stop the motor quickly.
• Ensure that no obstructions impede or restrict emergency stop switch operation.
• Take care not to pull the stop switch cord or knock out the lock plate during normal operation. The motor will stop abruptly, and the loss of forward motion may unexpectedly throw occupants forward.
There is a spare plastic lock plate for temporary use only. Remove it from the cord and place in a safe place on the boat. However, the original cord and lock plate should be replaced as soon as possible.
- Set the tilt lock lever (1) to the “Lock” position. (Tiller handle model)

STARTING THE ENGINE
• Never start the engine or let it run indoors or where there is little or no ventilation. Exhaust gas contains carbon monoxide, a gas that is colorless and odorless and can cause death or severe injury.
• Before starting the engine, make sure that you have enough fuel and oil to complete your intended trip.
If the emergency stop switch lock plate is not in position, the starter motor cannot operate.
TILLER HANDLE MODEL
- Squeeze the fuel line priming bulb several times until you feel resistance.
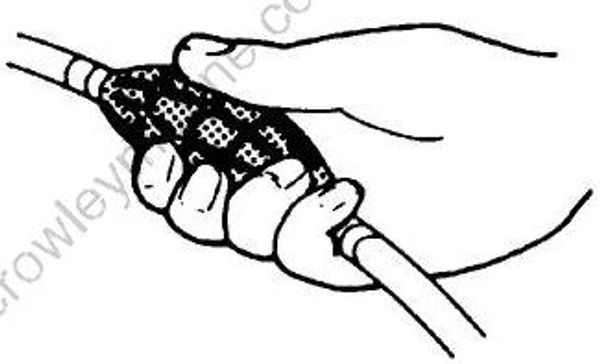
- Make sure that the throttle control grip is in the fully closed position.

- Turn the ignition key to the “ON” position. If nothing abnormal is indicated by the buzzer, then turn the key to the “START” position to start the engine.
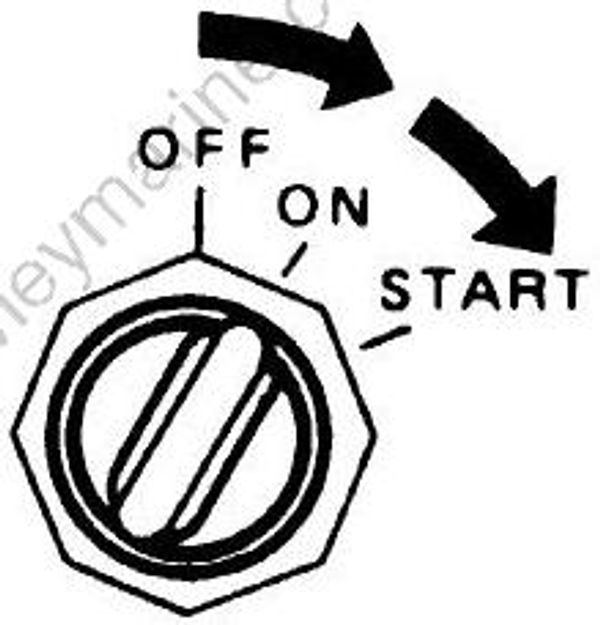
Never move the ignition key to “START” position for more than 5 seconds, or the starter system could be damaged.
If the engine fails to start after 5 seconds, wait a
few seconds and try again.
If the caution buzzer remains sounded while operating, check the engine oil level after stopping the engine.
- Warm up the engine for about 5 minutes.
If the caution buzzer remains sounded while operating, check the engine oil level after stopping the engine.
REMOTE CONTROL MODEL
- Squeeze the fuel line priming bulb several times until you feel resistance.
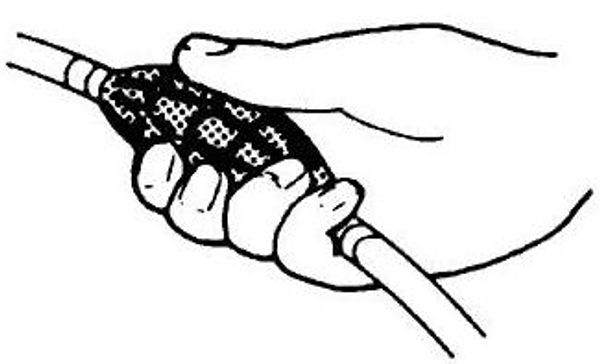
- Side mount type:
Make sure the warm-up lever is in the fully closed position.

- Turn the ignition key to the “ON” position, then observe the monitor-tachometer indication. If nothing abnormal is indicated, then turn the key to the “START” position to start the engine.
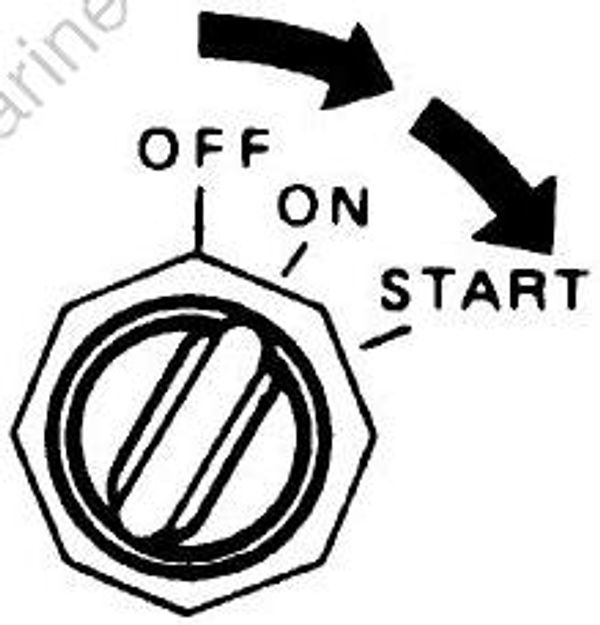
Never move the ignition key to “START” position for more than 5 seconds, or the starter system could be damaged.
If the engine fails to start after 5 seconds, wait a few seconds and try again.
- Warm up the engine for about 5 minutes.
If the OIL lamp remains lit while operating, check the engine oil level after stopping the engine.
Cooling water check
As soon as the engine starts, water should spray out of the pilot water hole 1, indicating that the water pump and cooling system are working properly. If you notice that water does not spray out of the pilot water hole, stop the engine as soon as possible and consult your authorized Suzuki Marine Dealer.

• Never operate your outboard motor when there is no water coming out of the pilot water hole, or severe damage can result.
• Before setting off, be sure that emergency stop switch operates properly.
EMERGENCY STARTING
If you must get the engine running, but are unable to do so because of starter system failure or battery discharge, you can use the emergency starting procedure to start the engine.
If the battery voltage is too low to operate the electric fuel pump, you will not be able to start the engine using the EMERGENCY STARTING procedure because sufficient fuel will not be supplied to the engine.
When rope-starting the engine, do not touch electrical components such as ignition coils or spark plug leads. Contact with these items may result in a severe electric shock.
- Make sure that the motor is in “NEUTRAL” and the emergency stop switch lock plate is removed.
When using the emergency starting procedure, the start-in-gear protection system will not work. If the shift lever is not in the “NEUTRAL” position, the boat can start off unexpectedly when the engine is started, causing personal injury.
- Remove the motor cover.
Disconnect the breather hose (A) from the cylinder head cover.
Pull the hose (B) out from the flywheel cover.
With the ignition key turned off, loosen the screws securing the flywheel cover and remove the flywheel cover with the breather hose.

Place the hose (B) not to contact with the fly wheel.
Squeeze the fuel line priming bulb several times until you feel resistance.
Turn the ignition key to the “ON” position and listen for the electric fuel pump to cycle.
The initial fuel pump cycle is for a period of 3 seconds after the ignition key is first turned on. If you are not sure about fuel pump operation, you may turn the key off, then repeat step #8.
With the ignition key turned off, tie a knot in one end of the emergency starter rope located in the tool kit. Tie the other end around the screw-driver handle in the tool kit.
Hook the knotted end of the rope in the pulley notch and wind the rope around the pulley in a clockwise direction.
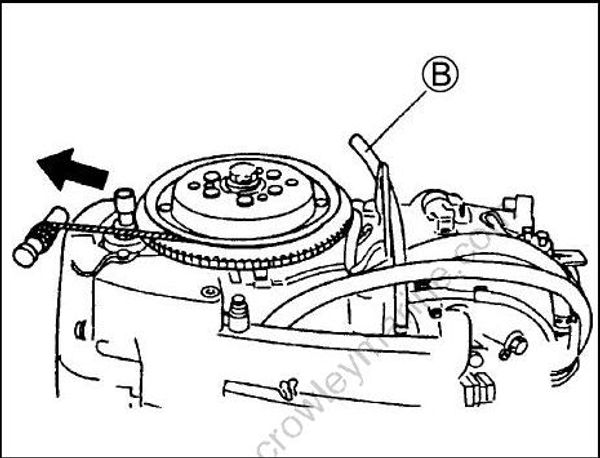
Put the emergency stop switch lock plate in place.
Turn the ignition key to the “ON” position.
After following steps for normal starting procedure, pull the emergency starter rope sharply to start the engine. Repeat, if the motor has not started.
• Do not re-install the flywheel cover or motor cover after starting the engine, or you may be injured.
• When the engine is running, keep your hands, hair, clothing, etc., away from the engine.
• Be sure to have the starter system repaired as soon as possible. You should not continue to use the emergency starting procedure for routine engine starting.
SHIFTING AND SPEED CONTROL
• Before shifting from “FORWARD” to “REVERSE” or from “REVERSE” to “FORWARD”, stop at the “NEUTRAL” position and allow the engine speed to return to idle and the boat speed to reduce.
• Exercise caution and use minimal speed when operating the boat in reverse. Be sure the handle/shift lever is in the desired position before accelerating.
Avoid shifting into gear when the engine is not running, or the shifting mechanism can be damaged.
TILLER HANDLE MODEL
Shifting
To shift the motor into “FORWARD”, set the throttle control grip to the idle position and pull the shift lever towards you firmly.
To shift into “REVERSE”, set the throttle to the idle position, and push the shift lever away from you firmly.
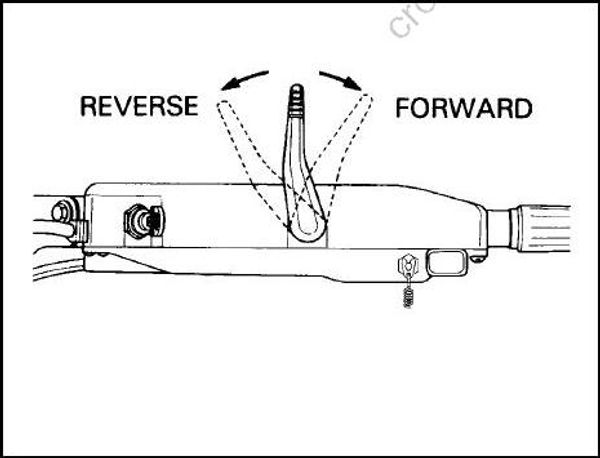
Speed control
After shifting, control the engine speed by twisting the throttle control grip.

REMOTE CONTROL MODEL
Shifting
To shift into “FORWARD”, squeeze the lock-out lever on the control handle and move the control handle forward to approximate position A, as shown in the illustration.
To shift into “REVERSE”, squeeze the lock-out lever on the control handle and move the control handle rearward to approximate position B, as shown in the illustration.
A detent or notch is present on all Suzuki control boxes to provide a “feel” for positions (A),(B), and neutral. Always shift quickly and firmly from neutral to position (A) or (B) to prevent abnormal wear on the gear and clutch engagement sur faces.
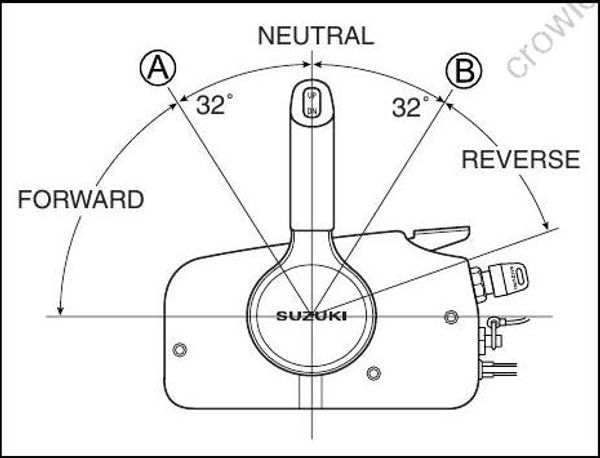
Top mount type Not equipped with a lock-out lever. Exercise
care when selecting neutral position.

Speed control
To increase speed after you have shifted into gear, continue moving the control handle for ward or rearward.
Since the same handle is used for shifting and speed control, you must be careful not to move the control handle too far forward or rearward when shifting. If you move the handle past the detent, throttle will be engaged and the boat can start moving suddenly.
STOPPING THE ENGINE
To stop the engine, shift into “NEUTRAL” and turn the ignition key to the “OFF” position. Always leave the ignition key in the “OFF” position when the motor is not running, or the battery can discharge.
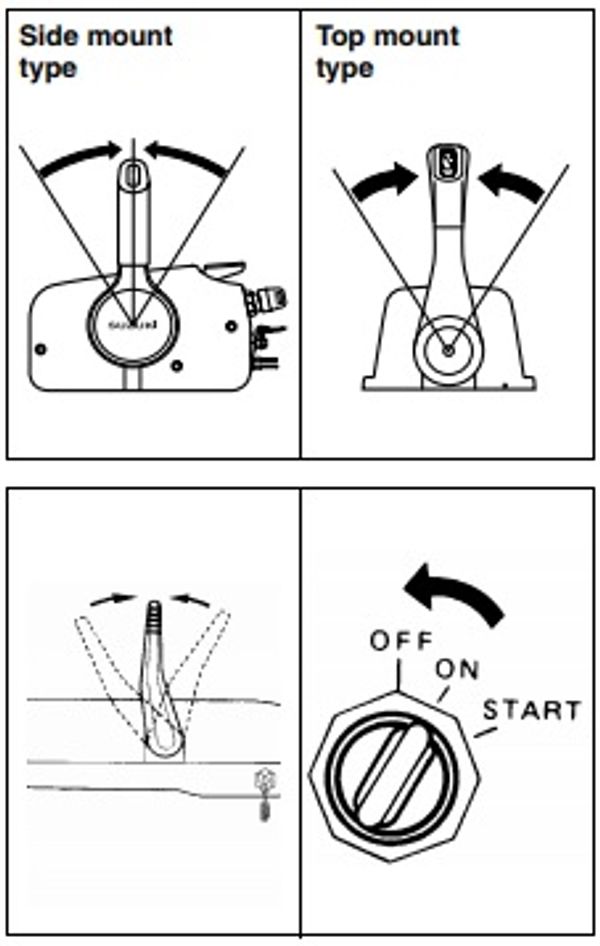
To prevent unauthorized use of your boat, be sure to remove the key and emergency stop switch lock plate when the boat is unattended.
To make sure that the emergency stop switch operates properly, stop the engine occasionally by pulling out the lock plate, while operating the engine at idling speed.
MOORING
The motor should be tilted up out of the water when you moor the boat in shallow water or if the motor will not be used for some time, to protect it from damage by underwater obstacles at low tide or corrosion from salt water.
Refer to the TILT LEVER section for details on how to tilt up the motor.
Disconnect the fuel line whenever you leave the motor tilted up for a long period of time, or fuel may leak out.
Do not allow your motor to rub against quay walls, piers or other boats when the boat is tied up.
OPERATION IN SHALLOW WATER
When operating your boat in shallow water, it may be necessary to tilt the motor higher than the normal trim angle. When you tilt the motor beyond the normal trim angle, however, you should only operate the boat at slow speeds. After returning to deep water, be sure to lower the motor to the normal trim angle.
To tilt the motor higher than the normal trim angle, use the Power Trim and Tilt switch. (Remote control model)
Do not operate the engine above 1500 r/min or operate the boat in a planning attitude with the engine beyond the maximum trim position (in other words, in a tilt position). In a tilt position, the swivel bracket will not have side support from the clamp bracket, and the power trim and tilt system will be unable to cushion the engine if the lower unit strikes an obstruction. This could lead to occupant injury. In addition, beyond the maximum trim position, the water intake holes may be above the water line, resulting in severe engine damage from overheating.
• When you tilt your motor for shallow water operation, make sure that the water intake holes remain in the water at all times and that water is always spraying out of the water discharge hole.
• Do not allow your motor to hit bottom. Serious damage can result. If the motor does strike bottom, inspect it immediately for damage.
OPERATION IN SALT WATER
After operating the motor in salt water, you should flush the water passages with clean, fresh water as outlined in the FLUSHING THE WATER PASSAGES section. If you do not flush the water passages, salt can corrode the motor and shorten its life.
OPERATION IN FREEZING WEATHER
When operating your outboard motor in freezing temperatures, you should keep the lower unit submerged in the water at all times.
When taking motor out of the water, stand it up in a vertical position until the cooling system drains completely.
If you leave your outboard motor out of the water in freezing temperatures with water still in the cooling system, the water can freeze and expand, causing severe damage to the motor.