

INSPECTION AND MAINTENANCE
MAINTENANCE, REPLACEMENT OR REPAIR OF EMISSION CONTROL DEVICES AND SYSTEMS MAY BE PERFORMED BY ANY MARINE SI ENGINE REPAIR ESTABLISHMENT OR INDIVIDUAL USING ANY PART WHICH HAS BEEN CERTIFIED UNDER THE PROVISIONS IN THE CLEAN AIR ACT Sec. 207 (a) (2)
MAINTENANCE SCHEDULE
It is important to inspect and maintain your outboard motor regularly. Follow the chart below.
At each interval, be sure to perform the indicated service. Maintenance intervals should be judged by number of hours or number of months, whichever comes first.
Exhaust gas contains carbon monoxide, a dangerous gas that is difficult to detect because it is colorless and odorless.Breathing carbon monoxide can cause death or severe injury.
Never start the engine or let it run indoors or where there is little or no ventilation.

I: Inspect and clean, adjust, lubricate, or replace, if necessary T: Tighten R: Replace
Improper maintenance or failure to perform recommended maintenance can be hazardous. Poor maintenance or lack of maintenance increases the chance of an accident or equipment damage.
Be sure to have maintenance performed according to the schedule in the above chart. Suzuki recommends that only your authorized Suzuki marine dealer or a qualified service mechanic perform maintenance on those items in the chart above which are marked with an asterisk (*). You may perform maintenance on the unmarked items by referring to the instructions in this section if you have mechanical experience. If you are not sure whether you can successfully complete any of the unmarked maintenance jobs, ask your authorized Suzuki marine dealer to do the maintenance for you.
The safety of you and your passengers depends on how well you maintain your outboard motor.
Follow all inspection and maintenance instructions carefully. If you do not have prior mechanical experience, do not attempt to perform maintenance on your outboard motor. You could be injured or may damage the motor.
The maintenance intervals in the chart were established for normal usage of your outboard motor. If your outboard motor is used under severe conditions such as frequent full throttle operation or frequent operation in muddy, silty, sandy, acidic, or shallow water, you may need to perform maintenance more often than indicated in the chart. Failure to perform maintenance more frequently could result in damage.
Consult your authorized Suzuki marine dealer regarding appropriate maintenance intervals for your usage conditions. When replacing parts on your outboard motor, Suzuki strongly recommends that you use genuine Suzuki parts or their equivalent.
SPARK PLUG
Your outboard motor comes equipped with the following “standard” spark plug for normal usage.
| Standard spark plug | CPR6EA-9 |
|---|
Non-resistor types of spark plugs will interfere with the function of the electronic ignition, causing misfiring, or causing problems with other electronic boat equipment and accessories.
Use ONLY resistor type spark plugs in your outboard motor.
Your authorized Suzuki Marine Dealer can determine if the standard spark plug is suitable for your type of motor usage by inspecting the color of the plug’s porcelain center electrode insulator after operation.
If the plug tends to run hot (usually evidenced by whitening of the insulator or a burnt electrode), stop using your motor immediately as severe engine damage may result. If the plug tends to run cold (usually evidenced by blackening of the insulator or a wet electrode), performance may suffer. Ask your authorized Suzuki Marine dealer to evaluate either of these problems to determine the cause.
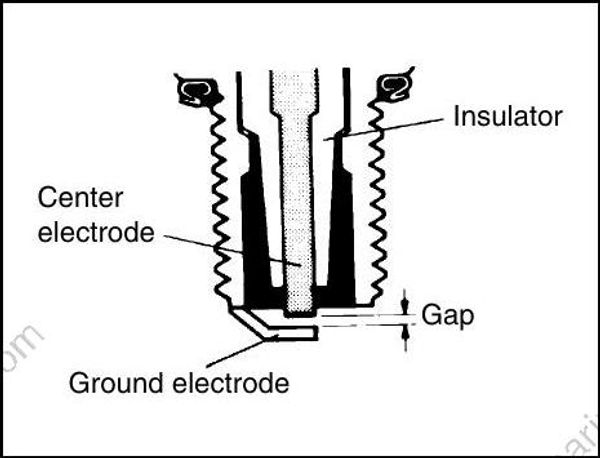
Use of improper spark plugs or improperly tightening spark plugs can cause severe engine damage.
• Do not experiment with other spark plug brands unless you can determine that they are directly equivalent to the specified brand, or you may experience engine damage which will not be covered under warranty. Note that aftermarket cross-reference charts may not be accurate.
• To install a spark plug; seat it as far as possible by hand, then use a wrench to tighten it to either the recommended torque setting or the specified rotation angle
• Do not overtighten or cross-thread a spark plug, as this will damage the aluminum threads of the cylinder head.
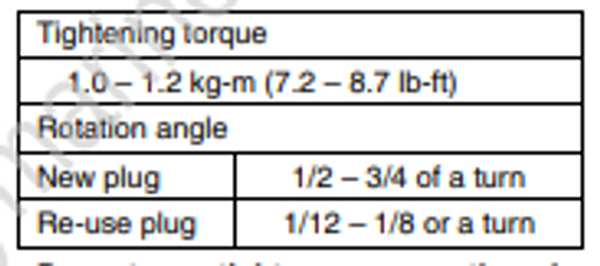

To maintain a strong spark, you should clean and adjust the plug at the interval shown in the maintenance schedule.
Remove carbon deposits from the spark plug using a small wire brush or spark plug cleaner, and adjust the gap as follows:
| Spark plug gap | 0.8 – 0.9 mm (0.031 – 0.035 in.) |
|---|
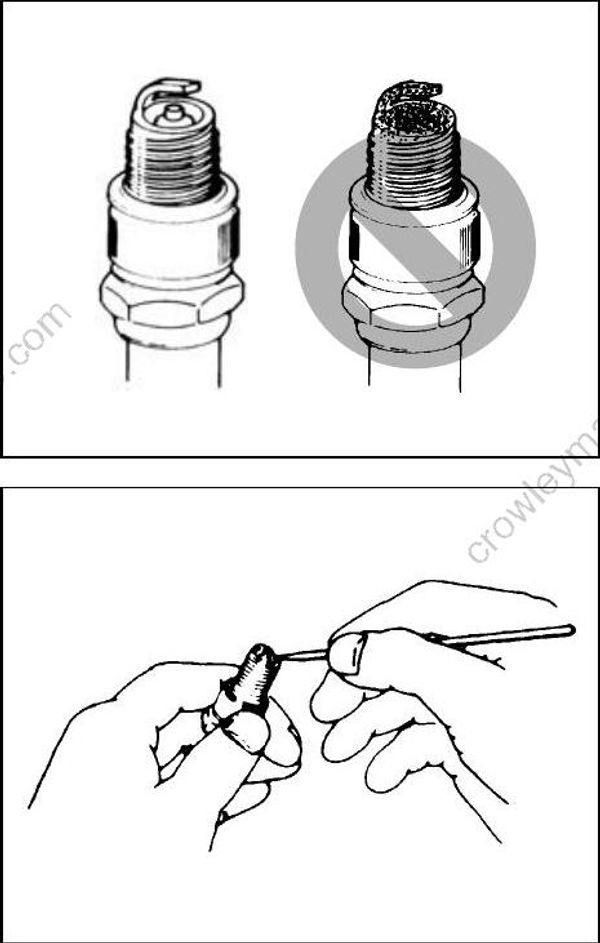
If the electrode or insulator is damaged, or if either shows excessive wear, then the spark plug should be replaced.
BREATHER AND FUEL LINE
Inspect the breather and fuel line for leaks, cracks, swelling, or other damage. If the breather and fuel line are damaged in any way, they must be replaced. Consult your authorized Suzuki Marine dealer if it is necessary to replace them.
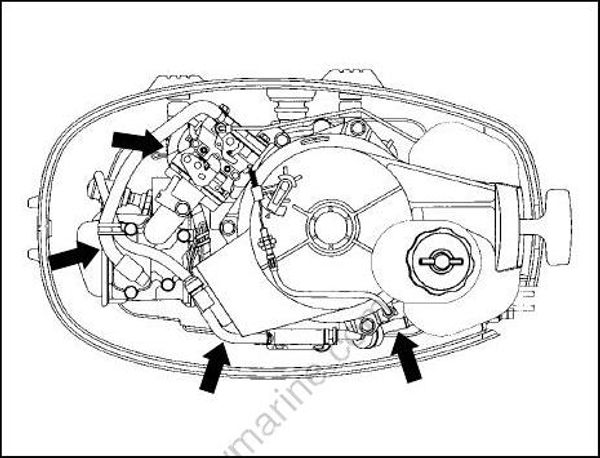
Fuel leakage can contribute to an explosion or fire, resulting in serious personal injury.
Have your authorized Suzuki marine dealer replace the fuel line if there is any evidence of leaking, cracking or swelling.
ENGINE OIL
Never perform any ENGINE OIL procedure with the motor running, as serious injury can occur.
The motor must be shut off before any ENGINE OIL procedures are performed.
Extended trolling can reduce oil life. Your engine may be damaged if you do not change engine oil more frequently under this type of use.
Change your engine oil more frequently if your engine is used for extended trolling.
Engine oil change
The oil should be changed when engine is warm so that the oil will drain thoroughly from the engine.
To change the engine oil:
- Place the motor in a vertical position and remove the motor cover. 2. Remove the oil filler cap.
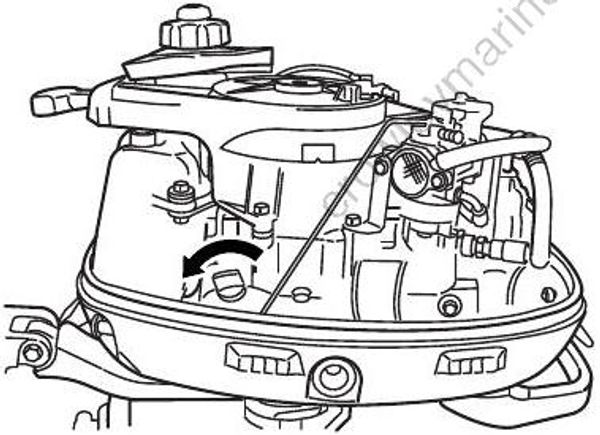
Fully steer the motor to the starboard side. 4. Place a drain pan under the engine oil drain plug.
Remove the engine oil drain plug and gasket, then let the engine oil drain.

- After draining, secure the engine oil drain plug with a new gasket.
A previously-used gasket may leak, resulting in engine damage.
Do not re-use gaskets. Be sure to always use new gaskets.
- Fill with recommended engine oil to the upper level.
Oil capacity: 0.7 L (0.74/0.62 US/Imp qt)
Engine oil: SAE (or NMMA FC-W) 10W-40
API (or NMMA FC-W) Classification
SG, SH, SJ, SL, SM
- Check the engine oil level. Refer to the INSPECTION BEFORE BOATING section.
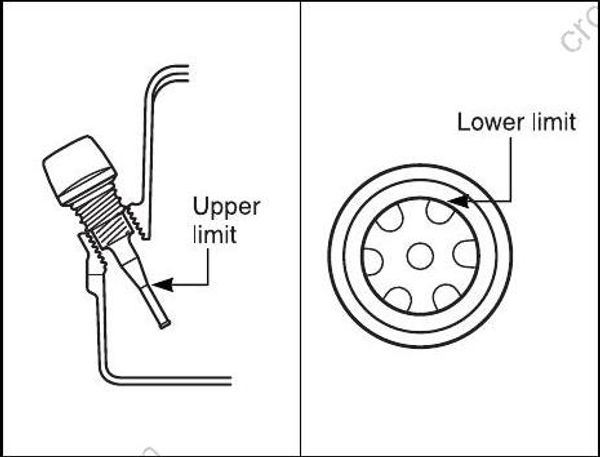
To avoid incorrect measurement of engine oil level, check oil level only when the engine has cooled.
- Reinstall the oil filler cap.
The engine oil temperature may be high enough to burn your fingers when the drain plug is loosened.
Wait until the drain plug is cool enough to touch with bare hands before removing it
Engine oil can cause injury to people or pets. Repeated, prolonged contact with used engine oil may cause skin cancer.
Even brief contact with used oil may irritate skin.
• Keep new and used oil away from children and pets.
• Wear a long-sleeve shirt and waterproof gloves when handling oil.
• Wash with soap if oil contacts your skin.
• Launder any clothing or rags that are wet with oil.
Recycle or properly dispose of used engine oil.
Do not throw it in the trash, pour it on the ground, down a drain, or into the water.
GEAR OIL
To check the gear oil level, adjust the engine to an upright position, remove the gear oil level plug and look into the hole. The oil level should be at the bottom edge of the hole. If the oil level is low, add the specified gear oil until the level reaches the bottom edge of the hole. Then, reinstall and tighten the plug.
Periodic gear oil replacement is essential for long life of your outboard motor. To change the gear oil:
Make sure the motor is in an upright position. Place a drain pan under the lower casing.
Remove the gear oil drain plug (1), then remove the gear oil level plug (2).

After the oil has drained completely, inject the specified gear oil into the lower drain hole until it just starts to come out of the upper level hole. Approximately 190 ml (6.4/ 6.7 US/lmp. oz.) will be required.
Reinstall and tighten the gear oil level plug (2), then quickly reinstall and tighten the gear oil drain plug (1).
To avoid insufficient injection of gear oil, check the gear oil level 10 minutes after following the procedure in the step 4. If the oil level is low, slowly inject gear oil into the gear oil level hole up to the correct level.
Gear oil can cause injury to people or pets. Repeated, prolonged contact with used gear oil may cause skin cancer.
Even brief contact with used oil may irritate skin.
• Keep new and used oil away from children and pets.
• Wear a long-sleeve shirt and waterproof gloves when handling oil.
• Wash with soap if oil contacts your skin.
• Launder any clothing or rags that are wet with oil.
Recycle or properly dispose of used gear oil.
Do not throw it in the trash, or pour it on the ground, down a drain, or into the water
If fishing line wraps around the rotating propeller shaft, the propeller shaft oil seal can become damaged and can allow water to enter the gear case causing severe damage.
If the gear oil has a milky color, it is contaminated with water. Immediately contact your authorized Suzuki marine dealer for advice. Do not operate your outboard until the oil is changed and the cause of the contamination is corrected
LUBRICATION
Proper lubrication is important for the safe, smooth operation and long life of each working part of your outboard motor. The following chart shows the lubrication points of your motor and the recommended lubricant:

Your authorized Suzuki Marine Dealer may also have additional recommendations due to regional climate or operating conditions. Please consult him for advice.
CORROSION PREVENTION ANODES
The motor is protected from exterior corrosion by anodes. These anodes control electrolysis and help prevent corrosion. The anodes will corrode in place of the parts they are protecting. You should periodically inspect each of the anodes and replace them when 2/3 of the metal has corroded away.
In certain areas of the country, the water is unusually harsh on metal. Additional anti-corrosion measures may be helpful under those conditions. Consult your authorized Suzuki Marine Dealer for details.
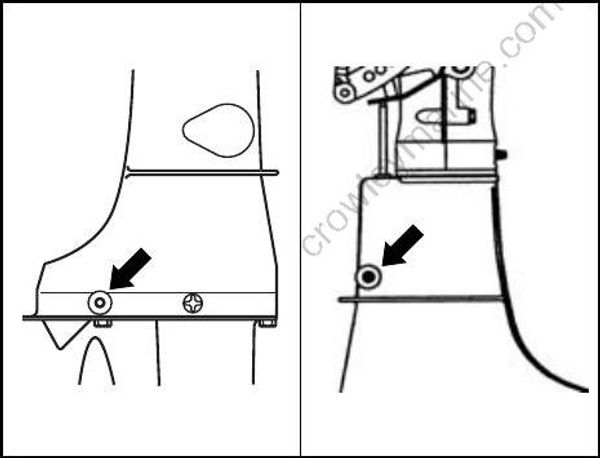
If anodes are not properly maintained, underwater aluminum surfaces (such as the lower unit) will suffer galvanic corrosion damage.
• Periodically inspect anodes to make sure they have not become detached.
• Do not paint anodes, as this will render them ineffective.
• Periodically clean anodes with a wire brush to remove any coating which might decrease their protective ability
ENGINE OIL FILTER
The engine oil filter must be inspected by authorized Suzuki Marine Dealer periodically.
Inspect engine oil filter at every 200hours (12 months).
FUEL FILTER
The fuel filter must be inspected by authorized Suzuki Marine Dealer periodically.
Inspect fuel filter at every 50 hours (3 months).
Replace fuel filter with a new one at every 400 hours (2 years).